
ROBERT LYNCH
boomsatsuma
MEDIA STUDENT
UNIT 44
ANALYSING SFX
Motion capture
 |  |  |  |  |  |
|---|
Motion capture (Mo-Cap for short) is a visual technique that is used in alot of todays movies as well as video games and even industries you wouldn't imagine such as various militaries and medical applications. An advantage to using Mo-Cap instead of other SFX techniques is the accuracy and consistancy of the technique, not only are the subjects primary movements recorded and transferred but their secondary movements are recorded extremely well. Even though the tech is very reliable the only draw back is you need the software to get the data needed to progress any further. The data is mapped to a 3D model that can replicate all the movements of the person wearing the suit which creates a very realistic looking body with realistic movements. "This process may be contrasted with the older technique of rotoscoping".
Green screen
 |  |  |  |  |  |
|---|
Chroma key or more commonly referred to as green screen is one of the most prevelant SFX techniques used in todays cinema, this is in part due to how effective and good looking the effect can be as well as the boom of super hero and world ending films in production these days. The market is craving huge levels of destruction and violence. It doesn't matter how many "true film fans" don't like the excesive use of the effect over practical effects and props, it'll still be used untill the next best thing comes along as it is making huge amounts of money for some people such as Michael Bay who use a massive amount of visually stunning green screen effects and raking in the money, though for a lot of people it is still too excesive.
Myself and other students used green screen in our own short film Dreamer. We used it as it was the most effective to use at the time and was able to produce a really clean out come that we were hoping for. As long as you have the softwaret to work with the data you don't even need to own a green screen, just borrow one or rent one for however long you need and get the shots.
Composite Video
(James Bond flicks)
 |  |  |  |
|---|
This opening sequence has to be one of the most famous of all time and yet many people would forget about it when considering SPX, most would turn to motion capturing, green screen ect. Yet this as well as being one of the most iconic is one of the best uses of special effects I've ever seen. If you are familiar with the James Bond films or just know of this opening sequence then you know there is a constant circle around James as he walks across the screen then in an instant with the theme music he turns and shoots you the viewer! This is excellent as it bridges the gap that the other above can't, we can't watch a world wide catalysm thses days without thinking "yeah yeah I've seen it before". We are disconected to that idea, yet to this day the James Bond screen collage opening is iconic and creates a moment with the viewer which will leave an ever lasting impression.
Pre production materials for a 2-3 minute audio-visual sequence
The Treatment


Dreamer Script


Storyboard
Scenes 1,3&8
 |  |  |  |
|---|
Dreamer storyboard, scenes 1,3&8; This is a blueprint for scenes 1,3&8 in our movie Dreamer. Though this is the final draft we left/excepted wiggle room with shots, with that being said we followed our plan as best as possible.
Scenes 2&7
 |  |  |  |
|---|
Dreamer storyboard, scenes 2,2,7; This is the storyboard for the football scene and firing scene. These were simple to follow as we knew exactly what shots we wanted and knew the areas we'd be filming.
Scene 3
 |  |  |  |
|---|
Dreamer storyboard, scene 3 (continuous); This is the storyboard for the continous scene where the main character Vince Lane walks through his house getting ready for work. This is the scene where we knew the most of our creative influences would shine through, specificly Edgar Wright.
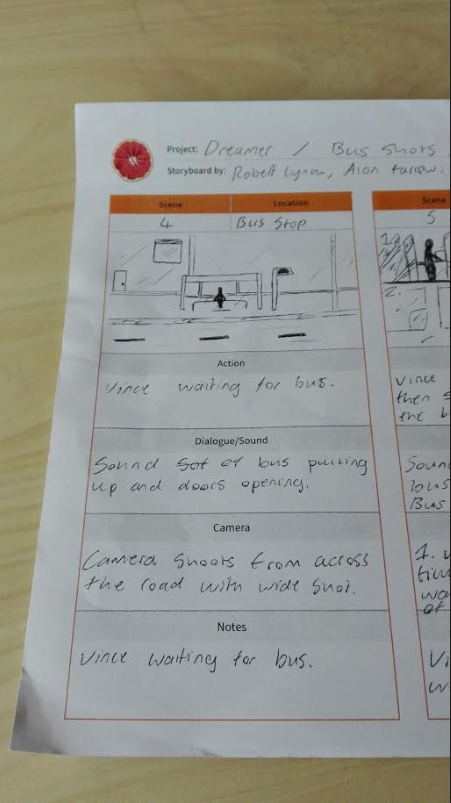
Scenes 4,5&6
 | |  |  |
|---|
Dreamer storyboard, scenes 4,5&6; This is the storyboard layout of scenes 4,5 and 6 in our movie Dreamer. These scenes show Vincents commute to work after leaving his house.
Location Recces for short film Dreamer

Location Recce for Lawrence Hill bus depot scene, we analysed the area and location for problems as well as a general profile of the location.
Location Recce for Greenbank RD and Ally way

Location Recce for Greenbank RD and Ally way we filmed at for Dreamer. The shots are of our character Vince going to work. In the location recce we analyse the areas we would be filming in from obstructions, permissions and more.
Location Recce for Packers Field

Location Recce for Packers field football scene. For this Recce we analysed the area for important information and obsticals that could effect the outcome of out film.
Dreamer risk assessment

Setting up appropriate equipment
This is the equipment used to film and record Dreamer. We booked the equipment through the boomsatsuma booking system.


Following script/ storyboard
 |  |  |
|---|
We used the storyboard we created as an outline for what we would film. Whatever scene we were filming we'd walk in knowing what we want as we have already planned the shot and content.

Describe your image.

Describe your image.

Describe your image.
Describe your image.

Describe your image.

Describe your image.

Describe your image.

Describe your image.

Describe your image.
For every scene we had the shot planned up on the storyboard, we also did plenty of practice shots in order to visually see any problems we had not thought of.
Props used


These props were the only props used in the film that were important to the narrative structure. We had to bring these props together for the film from different members of the crew.
Following production proccess

We followed our filming schedule to make sure all the shots we needed were done by the time we needed them. While filming the visual and recording the audio footage for the film we had our editing software open to edit as we filmed.

Describe your image.

Describe your image.

Describe your image.

Describe your image.

Describe your image.

Describe your image.

Describe your image.

Describe your image.

Describe your image.
SCREEN SHOTS FROM DREAMER
(EDITING)

Describe your image.

Describe your image.

Describe your image.

Describe your image.

Describe your image.

Describe your image.
SFX IN OUR FILM
DREAMER
 |  |  |
|---|
For our "main" use of SFX in our film we utilized green screen to put our lead actor in a football stadium. (Above) is the process we went through to create the scene. We first had our actor standing in front of a green screen and then we put that over an image of a football stadium we got. After that we used Anchor points and a virtual camera so that the stadium moves away from the camera in realistic way as the physical camera moves away from the actor.
 |  |  |  |  |  |
|---|
Another visual SFX we used was the "whip pan" we used this to swiftly go between scenes and further storytelling through large jumps in time for example, we used a whip pan from an alleyway shot to a bus stop shot which took 4 seconds roughly, where as filming out actor walking all the way down the alley then to the bus stop.
(3:16 - 3:33)
The third visual effect we used in the film was a rewind scene where we rewinded the whole film to show that the lead character of dreamer is infact in a dream. The rewind in Vince awakening to the real work and the Dream is being pulled away.
Logging Rushes


These are all the shots from Vince's bedroom, we separated them into their own folder to make it easier to find them.


These were all the shots from the opening window shot, the football scene, other outside shots and Vince at his work place.
Applying visual and audio transitions

This is a screen shot of the transitions between audio and visuals used in my Dreamer film. The transitions were used to move between scenes as well as create smooth transitions between noises that can be secondary and primary noises.

Describe your image.

Describe your image.

Describe your image.
Describe your image.
For audio effects we faded sound as well as used a lot of foley sounds instead of the live noises such as dogs barking, an alarm clock, clock ticking, teeth being brushed ect.